
Browser facing certificate for Shibboleth IdP using the Certificate snap-in in Windows
Earlier versions of the IdP may use jetty.browser.keystore.password instead of jetty.sslContext.keyStorePassword
This page will take you through creating a browser facing certificate using the certificate snap-in to the Microsoft management Console (MMC) in Windows.
Note: we use idp.example.ac.uk as the FQDN for your Shibboleth IdP in this example. You should replace this with the correct domain for your organisation throughout this process (you will need to own the public DNS domain). This DOES NOT need to match the hostname of the computer, but WILL need to match the FQDN by which the computer is referenced through DNS for the certificate to be accepted by the browser
There are several parts to this:
- Prerequisites
- Creating a suitable certificate request
- Sending the request off for signing
- Generating a suitable PKCS12 file from the validated certificate
- Referencing the new file from Jetty/Shibboleth IdP
1. Prerequisite: Certificate manager
Open MMC Certificate Manager for the local computer (referred from now on as to as CertManager in this doc)
- Log into the Windows IdP instance
- Run 'mmc.exe'
- File menu -> Add/Remove Snap-in...
- select 'Certificates', add, Computer account, Local computer, OK
More detailed instructions: Add the Certificates Snap-in to an MMC Unless otherwise stated, all settings should be left as default - screenshots show the more complex changes required as appropriate
2. Generating a suitable certificate request
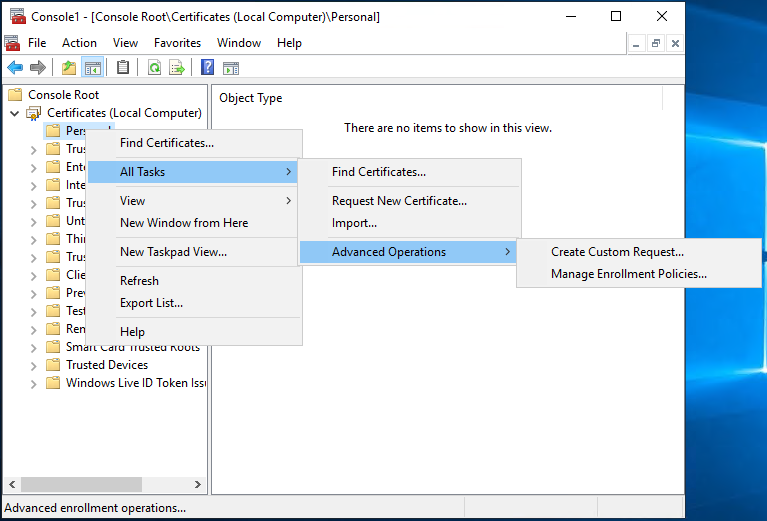
- In CertManager, expand 'Certificates (Local Computer)', 'Personal' and 'Certificates' folders
- Right click, choose 'All Tasks', choose 'Advanced Operations' and 'Create Custom Request'
- On the 'Select Certificate Enrolment Policy' page, choose 'Proceed without enrolment policy'
- On the 'Custom request' page, ensure that 'Template' is set to '(No template) CNG key' and that 'Request format' is set to 'PKCS #10', then hit 'Next'.
- On the 'Certificate Information' page, click the drop down for 'Details' and then 'Properties'
- On the 'General tab', enter the 'Friendly name:' as 'HTTPS certificate for idp.example.ac.uk'
- On the 'Subject' tab, under 'Subject name' select Type: 'Common name' and enter value '
idp.example.ac.uk', repeat this for each of the follow- Country � C (country) i.e.
GB - Email � E (a contact e-mail address) e.g.
it@example.ac.uk - Locality � L (town / city) e.g.
Example City - Organization � O (Organization Name) e.g.
Example University - State � S (County) e.g.
Example
- Country � C (country) i.e.
- On the 'Subject' tab, under 'Alternative name' select Type: 'DNS' and enter value '
idp.example.ac.uk'. You may wish to repeat this step for any additionalSubjectAlternativeNamesthat are required.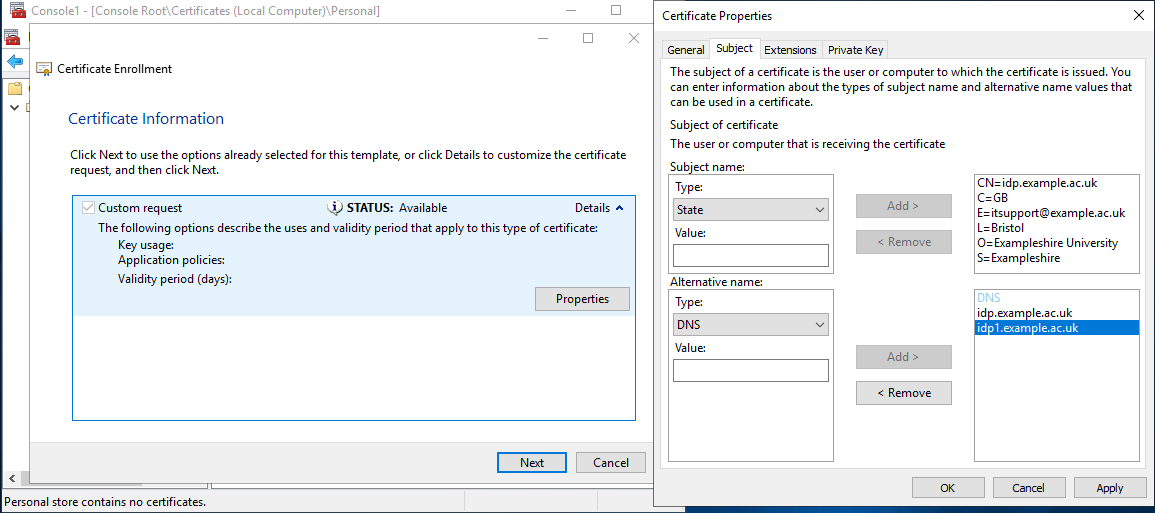
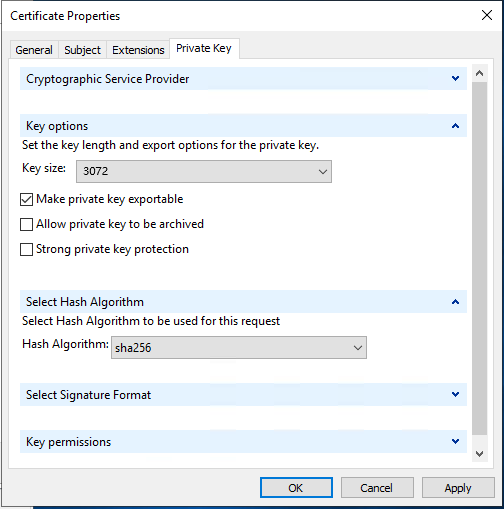
- On the 'Private Key' tab:
- under 'Cryptographic Service provider' ensure that 'RSA,Microsoft Software Key Storage Provider' is selected
- under 'Key options' set the 'Key size:' to at least '3072', choose 'Make private key exportable'
- under 'Select Hash Algorithm' set the Hash Algorithm to 'SHA256'
- Click OK to close the Certificate Properties dialogue,
- On the 'Certificate Information' page click 'Next'
- Enter a filename for the certificate request e.g.
idp.example.ac.uk, and ensure that Base64 is now ticked, save
3. Sending the certificate off for signing:
- Take your
idp.example.ac.uk.csrfile and submit to your chosen Certificate Authority. There are many certificate signing services available. Once the request is validated, you will receive a .cer/.crt file corresponding to the request you sent, plus any required intermediate certificates, which you will need to re-import in the next step.
4. Generating a suitable PKCS12 file from the validated certificate
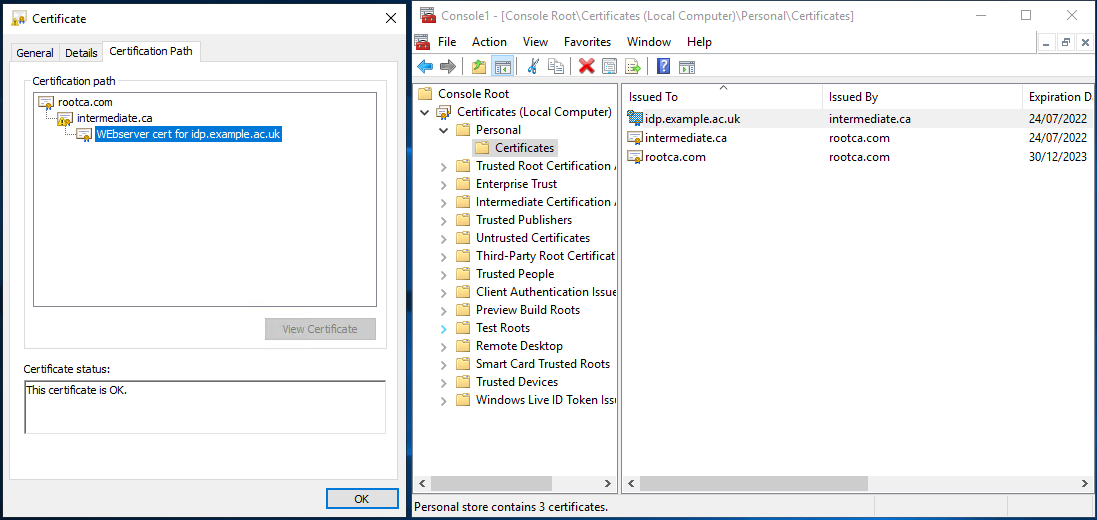
You have a private key that will work with this certificate on the instance on which you generated the request (it doesn't show up in CertManager though) - your finished PKCS12 file will contain this key, the issued certificate and the issuing certificate hierarchy) - a correctly configured example will look similar to this when finished:
- Once you have your validated certificate (and normally a collection of Intermediate certificates from your CA) from the certification authority, you can then import each into CertManager. These are sometimes provided as a Zip file, so you may need to unzip those to a suitable location first.
- Import each certificate from your Certification authority:
- Within CertManager (Certificate(Local Computer)/Personal/Certificates) right Click, choose All Tasks, and then Import. On the first page of the Certificate Import Wizard, ensure Store Location is 'Local Machine' and hit next
- Select the File name of the certificate to import, and hit Next
- On the Certificate Storage, page ensure it is selected to 'Place all certificate in the following store', and Certificate Store: Personal.
- On the 'Completing the Certificate Import Wizard' page hit 'Finish' - you should now see the freshly imported certificate listed (as in above image)
- From within CertManager, open your certificate, it should state that 'You have a private key that corresponds to this certificate'
- select the 'Certification Path' tab - you will need to export all the listed certificates listed in the hierarchy (they should all be present under personal certificates)
- Back in CertManager/personal select all the certificates in the hierarchy, choose 'All Tasks' and 'Export'
- On the Certificate Export Wizard, Choose 'Next'.
- Export Private Key, Choose 'Yes, export the private key'
- Export File Format, should now have chosen 'Personal Information Exchange - PKCS #12 (.PFX), ensure that 'Export all extended properties' are chosen, and choose Next
- Under 'Security', choose 'Password'. This password will need to match the password in
C:\Program Files(x86)\Shibboleth\IdP\jetty-base\start.d\idp.ini, fieldjetty.sslContext.keyStorePasswordso set it and/or change the stored password as appropriate (the curly brackets in the default password are part of the password):
jetty.sslContext.keyStorePassword=superStrongPassword1
- Under File to Export, Select the file, navigate to
C:\Program Files(x86)\Shibboleth\IdP\credentialsand choose 'Save as Type', and 'All Files (*.*)', enter a suitable filename e.g.idp.example.ac.uk.pfxand Click Next - Completing the certificate Export Wizard, Click Finish, and on you should have a dialogue to say that 'The Export was successful'
- Check: in a command prompt, run
keytool -list -v -keystore idp.example.ac.uk.pfx -storetype PKCS12
(enter password from above) - this should list the contained certificates (in a not very readable way)
Replacement certificate based on existing private key
Note: If this a replacement cert based on existing private key (ie csr reissued), then key may not associate. In this case run (where that unpleasant number is unmatched cert serial):
certutil -repairstore my 2ab348978e951b1a9dd69c0b0e6de5c4
You can get the serial from UI (but no copy + paste) or run certutil <certfile> (serial at the top)
5. Referencing the new file from Jetty/Shibboleth IdP
- Open up
C:\Program Files(x86)\Shibboleth\IdP\jetty-base\start.d\idp.iniand on the linejetty.sslContext.keyStorePath=changeidp-userfacing.p12toidp.example.ac.uk.pfx - You can now (re)start the Shibboleth IdP. In the command prompt type:
 net stop shibd_idp
 net start shibd_idp
(Or use services MMC snapin)
Check: On a different computer, visit your IdP status page at https://idp.example.ac.uk/idp/status in a Browser. the status page should be displayed without any certificate errors. Check the certificate seen by the browser matches that created above (and importantly all the intermediate certificates are in place)
(If you are testing without the relevant external DNS records and firewalls in place you might wish to temporarily add an entry to your system hosts file C:\Windows\System32\drivers\etc\hosts so that you can test)
<IP of IdP server> idp.example.ac.uk
Verification: Run the free server check provided by https://www.ssllabs.com/ssltest/ - specifically check the certificate is valid and all the intermediates are in place